SpringBoot应用打出的jar包, 是可以直接使用 java -jar XXX.jar 命令直接启动的, 那么背后的原理是怎样的?
JarLauncher
jar包结构
首先先看一下springboot的jar包结构是什么样的。
新建一个springboot工程(可以直接使用idea自带的Spring Initializer创建), 然后使用mvn clean package打包, 使用压缩软件打开jar包, 观察其内部结构如下:
1
2
3
4
5
6
7
8
9
10
11
12
13
14
15
16
| .
├── BOOT-INF
│ ├── classes
│ │ ├── application.properties
│ │ ├── cn
│ │ ├── static
│ │ └── templates
│ └── lib
│ ├── spring-core-5.2.2.RELEASE.jar
│ ├── spring-webmvc-5.2.2.RELEASE.jar
│ ├── ...// 这里略了大量jar包
├── META-INF
│ └── MANIFEST.MF
└── org
└── springframework
└── boot
|
现在分别说明如下:
- MANIFEST.MF 该文件描述了jar包的一些关键信息, 其中
Main-Class指定了启动类, 在springboot应用中该项是org.springframework.boot.loader.JarLauncher, 该类后续还要深入分析
- BOOT-INF/classes 工程的源代码编译完成后的class文件
- BOOT-INF/lib 工程依赖的第三方jar包文件
- org 目录: Spring Boot loader 相关的源代码,其中的
JarLauncher就放在此处
Launcher
Launcher
各种 Launcher 的基础抽象类,用于启动应用程序,跟 Archive 配合使用。
目前有三种实现:
- JarLauncher
- WarLauncher
- PropertiesLauncher
Archive
归档文件的基础抽象类。
- JarFileArchive 就是 jar 包文件的抽象。它提供了一些方法比如 getUrl 会返回这个 Archive 对应的 URL。getManifest 方法会获得 Manifest 数据等。
- ExplodedArchive 是文件目录的抽象。
JarFile
对 jar 包的封装,每个 JarFileArchive 都会对应一个 JarFile。JarFile 被构造的时候会解析内部结构,去获取 jar 包里的各个文件或文件夹,这些文件或文件夹会被封装到 Entry 中,也存储在 JarFileArchive 中。如果 Entry 是个 jar,会解析成 JarFileArchive。
在执行java jar XXX.jar的时候, 首先触发的是 org.springframework.boot.loader.jar.Handler的main方法, 而不是我们自定义的XXXApplication。
这里需要注意一点, 直接在idea中搜索JarLauncher这个类是搜不到的, 是因为该类是在编译的时候直接导入到Jar包中的, 如果需要看源码, 需要在pom文件中引入如下依赖:
1
2
3
4
| <dependency>
<groupId>org.springframework.boot</groupId>
<artifactId>spring-boot-loader</artifactId>
</dependency>
|
从JarLauncher的main方法开始进行分析,其主要流程如下:
1
2
3
4
5
6
7
8
9
| protected void launch(String[] args) throws Exception {
if (!isExploded()) {
JarFile.registerUrlProtocolHandler();
}
ClassLoader classLoader = createClassLoader(getClassPathArchivesIterator());
String jarMode = System.getProperty("jarmode");
String launchClass = (jarMode != null && !jarMode.isEmpty()) ? JAR_MODE_LAUNCHER : getMainClass();
launch(args, launchClass, classLoader);
}
|
- 创建一个自定义类加载器 LaunchedURLClassLoader,遵循双亲委派机制,对于父类无法加载的类,则由 LaunchedURLClassLoader 进行加载,其加载的路径包括 BOOT-INF/lib 和 BOOT-INF/classes
- 调用
Thread.currentThread().setContextClassLoader(classLoader)将其设置为线程上下文加载器
- 反射执行我们自定义的springboot启动类的main方法,也就是使用
@SpringBootApplication注解的类
一个普通的springboot项目一般都是使用如下方式来启动的:
1
2
3
4
5
6
7
8
9
10
11
| @SpringBootApplication
public class Application {
public static void main(String[] args) {
try {
SpringApplication.run(Application.class, args);
} catch (Exception e) {
e.printStackTrace();
}
}
}
|
这里我们可以看到主要是一个@SpringBootApplication注解和SpringApplication的run()方法。下面对这两个进行详细解释。
SpringBootApplication注解
1
2
3
4
5
6
7
8
| @Target(ElementType.TYPE)
@Retention(RetentionPolicy.RUNTIME)
@Documented
@Inherited
@SpringBootConfiguration
@EnableAutoConfiguration
@ComponentScan(excludeFilters = { @Filter(type = FilterType.CUSTOM, classes = TypeExcludeFilter.class),
@Filter(type = FilterType.CUSTOM, classes = AutoConfigurationExcludeFilter.class) })
|
该注解主要由三个注解组合而成,其他的都是常规注解, 分别是:
- @ComponentScan
- @EnableAutoConfiguration
- @SpringBootConfiguration
@ComponentScan
该注解的主要作用是用来进行包扫描, 从而创建bean。
其中有一个AutoConfigurationExcludeFilter, 其作用是用来进行包扫描的时候排除自动配置的类, 简而言之不扫描自动配置类。
@EnableAutoConfiguration
该注解是SpringBoot中用来实现自动装配的关键。
1
2
3
4
5
6
| @Target(ElementType.TYPE)
@Retention(RetentionPolicy.RUNTIME)
@Documented
@Inherited
@AutoConfigurationPackage
@Import(AutoConfigurationImportSelector.class)
|
这里重点关注的是@Import(AutoConfigurationImportSelector.class)这一行, 该注解的作用分为如下三点:
- 导入被
@Configuration修饰的配置类
- 导入实现了
ImportSelector接口的配置类
- 导入实现了
ImportBeanDefinitionRegistar接口的配置类
该注解最终调用的是SpringFactoriesLoader类中的loadSpringFactories()方法, 此方法会加载在META-INF/spring.factories中已经定义好的配置类。
从而通过此注解, 实现将所有的配置类自动装载到spring容器中去。
下面是springboot 2.1.3版本中autoconfigure模块该文件部分内容:
1
2
3
4
5
6
7
8
9
10
11
12
13
14
15
16
17
18
19
20
21
22
23
24
25
26
27
28
29
30
31
32
33
34
35
36
37
38
39
40
| # Initializers
org.springframework.context.ApplicationContextInitializer=\
org.springframework.boot.autoconfigure.SharedMetadataReaderFactoryContextInitializer,\
org.springframework.boot.autoconfigure.logging.ConditionEvaluationReportLoggingListener
# Application Listeners
org.springframework.context.ApplicationListener=\
org.springframework.boot.autoconfigure.BackgroundPreinitializer
# Auto Configuration Import Listeners
org.springframework.boot.autoconfigure.AutoConfigurationImportListener=\
org.springframework.boot.autoconfigure.condition.ConditionEvaluationReportAutoConfigurationImportListener
# Auto Configuration Import Filters
org.springframework.boot.autoconfigure.AutoConfigurationImportFilter=\
org.springframework.boot.autoconfigure.condition.OnBeanCondition,\
org.springframework.boot.autoconfigure.condition.OnClassCondition,\
org.springframework.boot.autoconfigure.condition.OnWebApplicationCondition
# Auto Configure
org.springframework.boot.autoconfigure.EnableAutoConfiguration=\
org.springframework.boot.autoconfigure.admin.SpringApplicationAdminJmxAutoConfiguration,\
org.springframework.boot.autoconfigure.aop.AopAutoConfiguration,\
org.springframework.boot.autoconfigure.amqp.RabbitAutoConfiguration,\
----此处省略-----
# Failure analyzers
org.springframework.boot.diagnostics.FailureAnalyzer=\
org.springframework.boot.autoconfigure.diagnostics.analyzer.NoSuchBeanDefinitionFailureAnalyzer,\
org.springframework.boot.autoconfigure.jdbc.DataSourceBeanCreationFailureAnalyzer,\
org.springframework.boot.autoconfigure.jdbc.HikariDriverConfigurationFailureAnalyzer,\
org.springframework.boot.autoconfigure.session.NonUniqueSessionRepositoryFailureAnalyzer
# Template availability providers
org.springframework.boot.autoconfigure.template.TemplateAvailabilityProvider=\
org.springframework.boot.autoconfigure.freemarker.FreeMarkerTemplateAvailabilityProvider,\
org.springframework.boot.autoconfigure.mustache.MustacheTemplateAvailabilityProvider,\
org.springframework.boot.autoconfigure.groovy.template.GroovyTemplateAvailabilityProvider,\
org.springframework.boot.autoconfigure.thymeleaf.ThymeleafTemplateAvailabilityProvider,\
org.springframework.boot.autoconfigure.web.servlet.JspTemplateAvailabilityProvider
|
综上, @SpringBootApplication注解的主要作用总结如下:
- 实现自动配置
- 定义需要加载到spring容器中的bean
SpringApplication类
SpringApplication.run()方法主要分为两步:
- 构造SpringApplication对象
- 执行该对象的run方法
下面分别就这两步进行说明。
构造SpringApplication对象
跟踪SpringApplication类实例初始化最终代码如下:
1
2
3
4
5
6
7
8
9
10
11
12
13
14
15
| public SpringApplication(ResourceLoader resourceLoader, Class<?>... primarySources) {
this.resourceLoader = resourceLoader;
Assert.notNull(primarySources, "PrimarySources must not be null");
this.primarySources = new LinkedHashSet<>(Arrays.asList(primarySources));
// 设置应用类型
this.webApplicationType = WebApplicationType.deduceFromClasspath();
// 设置初始化
setInitializers((Collection) getSpringFactoriesInstances(
ApplicationContextInitializer.class));
// 设置事件监听器
setListeners((Collection) getSpringFactoriesInstances(ApplicationListener.class));
// 找出main方法所属的类
this.mainApplicationClass = deduceMainApplicationClass();
}
|
就其中关键的几个步骤进行说明
设置应用类型
1
| this.webApplicationType = WebApplicationType.deduceFromClasspath();
|
应用类型共分为三种, 分别如下:
NONE:正常流程走,不额外的启动web容器, 比如Tomcat。SERVLET:基于servlet的web程序,需要启动内嵌的servletweb容器,比如Tomcat。REACTIVE:基于reactive的web程序,需要启动内嵌reactiveweb容器
通过判断是否加载了对应的类,比如加载了DispatcherServlet等则会判断是Servlet的web程序, 比如引用了spring-boot-starter-web模块, 则 是web程序。
设置初始化器
初始化器ApplicationContextInitializer, 用于Spring的IOC容器在刷新之前, 进行一些组件的初始化, 比如ServletContextApplicationContextInitializer。
其最终调用是SpringFactoriesLoader.loadSpringFactories()方法, 该方法同@EnableAutoConfiguration注解作用类似, 会从META-INF/spring.factories中加载定义好的类,此处对应的key是 org.springframework.context.ApplicationContextInitializer。
例如在spring-boot-autoconfigure模块该值对应如下:
1
2
3
4
| # Initializers
org.springframework.context.ApplicationContextInitializer=\
org.springframework.boot.autoconfigure.SharedMetadataReaderFactoryContextInitializer,\
org.springframework.boot.autoconfigure.logging.ConditionEvaluationReportLoggingListener
|
在spring-boot模块该值对应如下:
1
2
3
4
| # PropertySource Loaders
org.springframework.boot.env.PropertySourceLoader=\
org.springframework.boot.env.PropertiesPropertySourceLoader,\
org.springframework.boot.env.YamlPropertySourceLoader
|
所以, 实际上的初始化器ApplicationContextInitializer在整个容器中会有多个, 只要实现了ApplicationContextInitializer接口并且在spring.factories文件中定义好就行。
设置事件监听器
监听器ApplicationListener主要是用来监听特定的事件ApplicationEvent, 比如IOC容器的刷新,关闭等。
其实现原理和上面的初始化器类似, 只不过这一次从spring.factories文件中加载的类的key是org.springframework.boot.SpringApplicationRunListener
执行run()方法
SpringApplication类构造完成之后, 就会调用该类的run()方法, 该方法的代码如下:
1
2
3
4
5
6
7
8
9
10
11
12
13
14
15
16
17
18
19
20
21
22
23
24
25
26
27
28
29
30
31
32
33
34
35
36
37
38
39
40
41
42
43
44
45
46
47
48
49
50
51
52
53
54
55
56
57
| public ConfigurableApplicationContext run(String... args) {
StopWatch stopWatch = new StopWatch();
stopWatch.start();
ConfigurableApplicationContext context = null;
Collection<SpringBootExceptionReporter> exceptionReporters = new ArrayList<>();
configureHeadlessProperty();
SpringApplicationRunListeners listeners = getRunListeners(args);
listeners.starting();
try {
ApplicationArguments applicationArguments = new DefaultApplicationArguments(
args);
ConfigurableEnvironment environment = prepareEnvironment(listeners,
applicationArguments);
configureIgnoreBeanInfo(environment);
Banner printedBanner = printBanner(environment);
context = createApplicationContext();
exceptionReporters = getSpringFactoriesInstances(
SpringBootExceptionReporter.class,
new Class[] { ConfigurableApplicationContext.class }, context);
prepareContext(context, environment, listeners, applicationArguments,
printedBanner);
refreshContext(context);
afterRefresh(context, applicationArguments);
stopWatch.stop();
if (this.logStartupInfo) {
new StartupInfoLogger(this.mainApplicationClass)
.logStarted(getApplicationLog(), stopWatch);
}
listeners.started(context);
callRunners(context, applicationArguments);
}
catch (Throwable ex) {
handleRunFailure(context, ex, exceptionReporters, listeners);
throw new IllegalStateException(ex);
}
try {
listeners.running(context);
}
catch (Throwable ex) {
handleRunFailure(context, ex, exceptionReporters, null);
throw new IllegalStateException(ex);
}
return context;
}
|
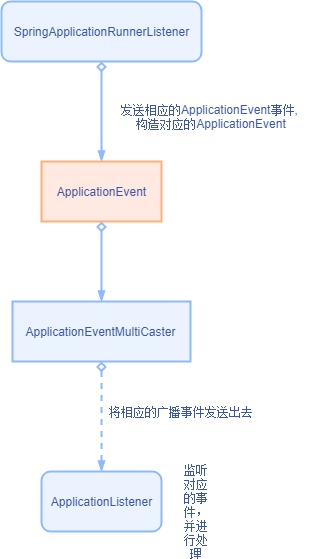
运行时监听器
此处获取的是SpringApplicationRunListeners, 该监听器的作用主要是用来监听应用程序启动过程的, 并将相应的事件广播出去。
首先需要获取, 对应的代码是(1)处的代码:
1
| SpringApplicationRunListeners listeners = getRunListeners(args);
|
类似的, 该类的定义还是在spring.factories文件中, 对应的key为org.springframework.boot.SpringApplicationRunListener, 在spring-boot模块中该值定义如下:
1
2
| org.springframework.boot.SpringApplicationRunListener=\
org.springframework.boot.context.event.EventPublishingRunListener
|
总共定义了如下几个事件类型:
- ApplicationStartedEvent: run方法执行的时候立马执行
- ApplicationEnvironmentPreparedEvent: ApplicationContext创建之前并且环境信息准备好的时候调用
- ApplicationPreparedEvent: ApplicationContext创建完成之后, refresh之前
- ApplicationReadyEvent: ApplicationContext成功启动
- ApplicationFailedEvent: ApplicationContext启动失败
这里需要需要说明一下此处的SpringApplicationRunListener和在构造SpringApplication对象时创建的ApplicationListener的联系:
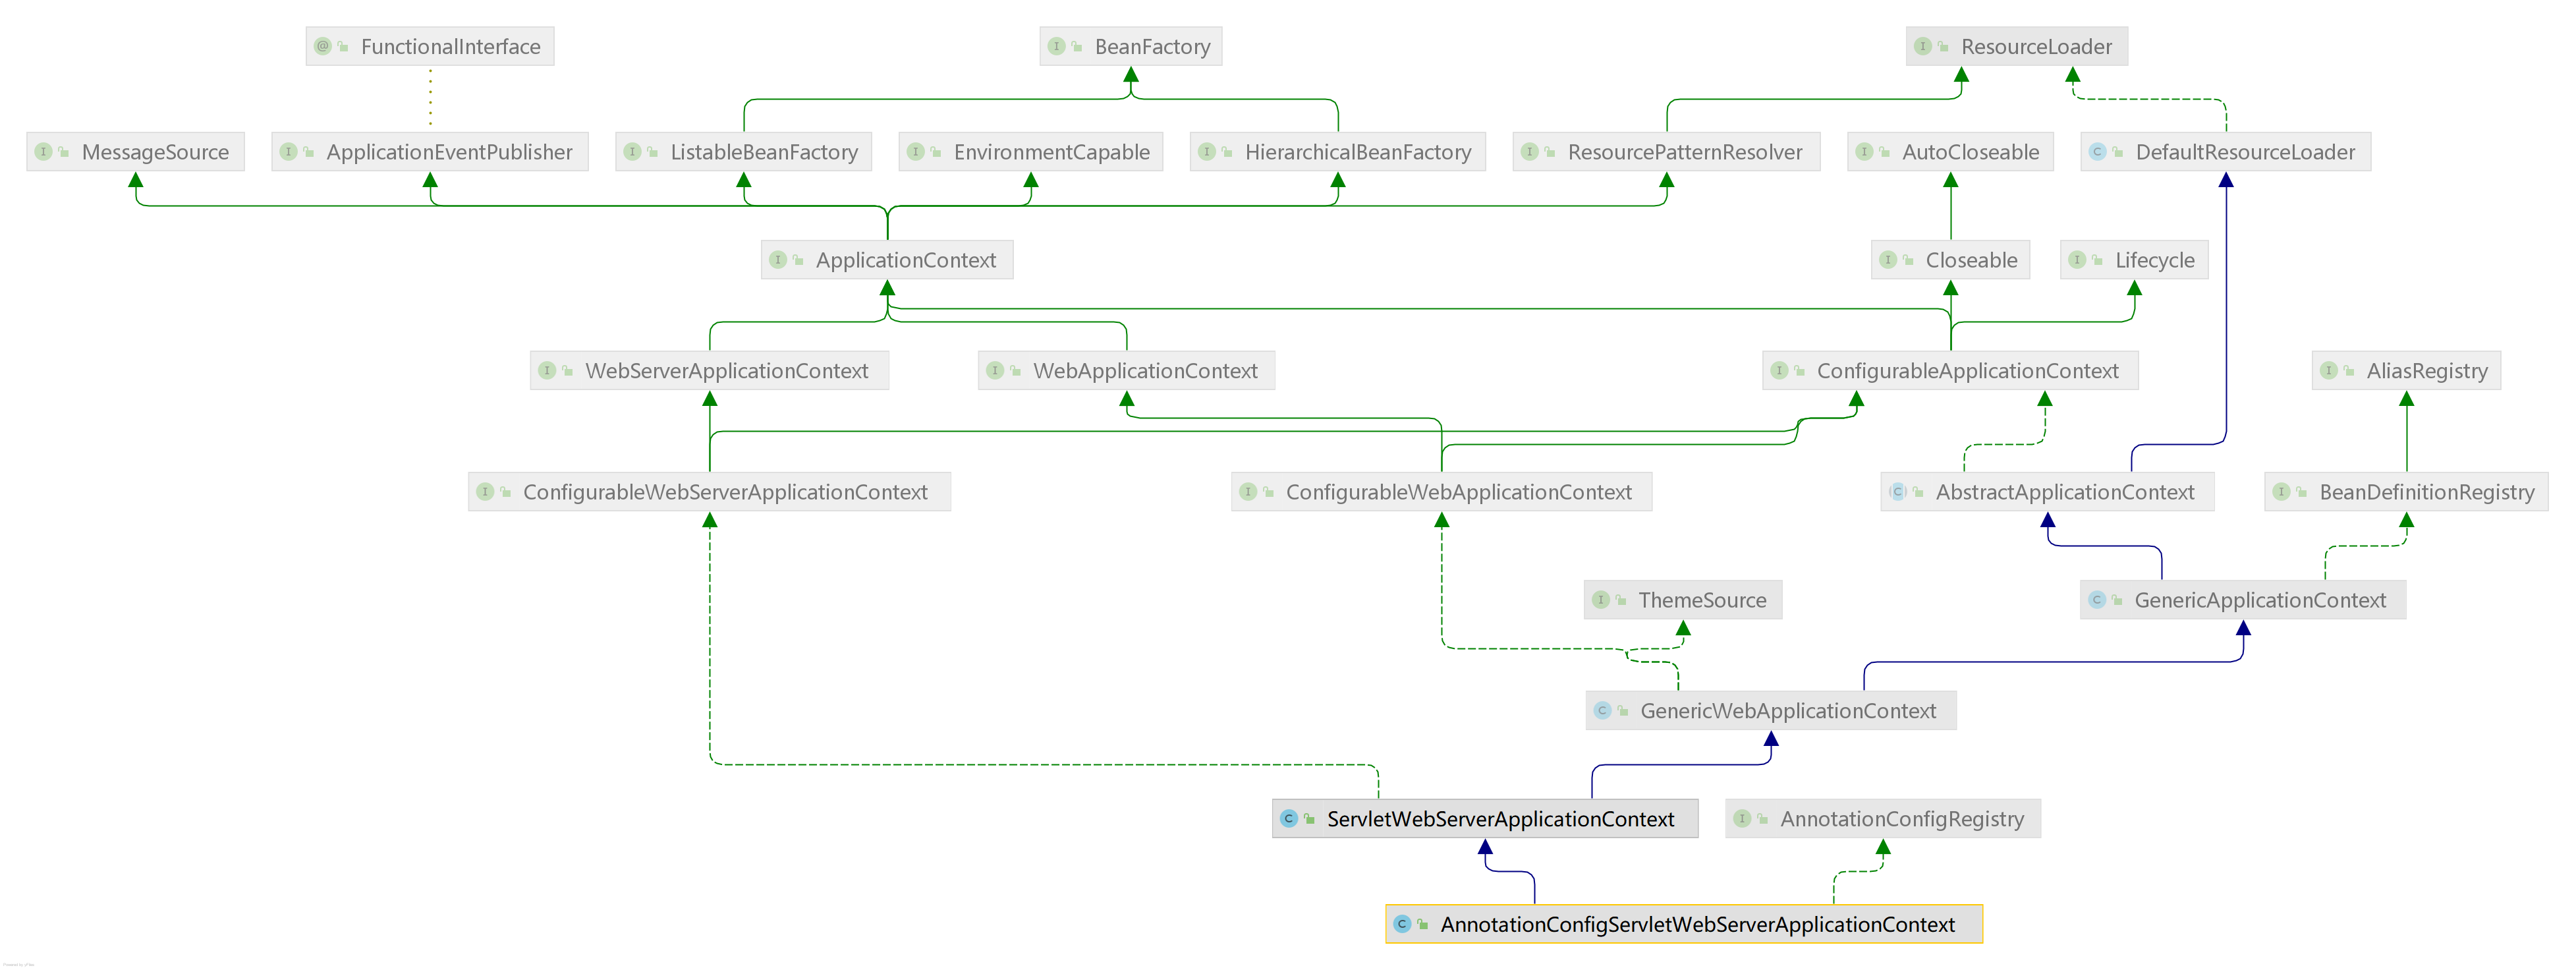
context的创建
首先是创建ApplicationContext, 这个过程很简单,就是根据webApplicationType创建相应的ApplicationContxet, 决定是servlet、reactive或者非web应用。
例如对于一个普通web的springboot工程,其最终的ApplicationContext实现类是:AnnotationConfigServletWebServerApplicationContext, 类结构如下所示:
prepareContext
该方法主要做的事如下:
- 基本的初始化,如设置Environment
- 注册已经有的对象为单例bean, 比如banner
- 加载main方法所在的类
其中加载main方法所在类的关键代码如下:
1
2
3
4
5
6
7
8
9
10
11
12
13
14
| protected void load(ApplicationContext context, Object[] sources) {
BeanDefinitionLoader loader = createBeanDefinitionLoader(getBeanDefinitionRegistry(context), sources);
if (this.beanNameGenerator != null) {
loader.setBeanNameGenerator(this.beanNameGenerator);
}
if (this.resourceLoader != null) {
loader.setResourceLoader(this.resourceLoader);
}
if (this.environment != null) {
loader.setEnvironment(this.environment);
}
loader.load();
}
|
首先会创建BeanDefinitionLoader, 然后利用该loader将主类的BeanDefinition加载到context中去。
其中需要说明一下BeanDefinition, Spring的bean的来源有各种方式, 比如xml文件或者注解的方式, 对于这些bean的定义, 每一个都会生成一个相应的BeanDefinition。
refresh
容器刷新的核心方法。该方法的主要作用是加载其他的BeanDefinition。
以web程勋为例, 其对应的context是AnnotationConfigEmbeddedWebApplicationContext, 跟踪其方法, 最终是调用其父类AbstractApplicationContext的refresh方法。
1
2
3
4
5
6
7
8
9
10
11
12
13
14
15
16
17
18
19
20
21
22
23
24
25
26
27
28
29
30
31
32
33
34
35
36
37
38
39
40
41
42
43
44
45
46
47
48
49
| public void refresh() throws BeansException, IllegalStateException {
synchronized (this.startupShutdownMonitor) {
prepareRefresh();
ConfigurableListableBeanFactory beanFactory = obtainFreshBeanFactory();
prepareBeanFactory(beanFactory);
try {
postProcessBeanFactory(beanFactory);
invokeBeanFactoryPostProcessors(beanFactory);
registerBeanPostProcessors(beanFactory);
initMessageSource();
initApplicationEventMulticaster();
onRefresh();
registerListeners();
finishBeanFactoryInitialization(beanFactory);
finishRefresh();
}
catch (BeansException ex) {
} finally {
}
}
}
|
对上面其中几个关键的步骤进行说明:
invokeBeanFactoryPostProcessors
从容器中找出BeanDefinitionRegistryPostProcessor和BeanFactoryPostProcessor接口的实现类, 然后按照特定的顺序执行。
注意其中有一个ConfigurationClassPostProcessor的接口, 是BeanDefinitionRegistryPostProcessor的实现类, 该类的作用就是解析所有被以下注解修饰的类
- @Configuration
- @Component
- @ComponentScan
- @Import
- @ImportResource
registerBeanPostProcessors
从容器中找出BeanPostProcessor接口的实现类, 在后面的方法finishBeanFactoryInitialization进行bean的实例化的时候, 会执行BeanPostProcessor。
onRefresh
子类实现。 例如对于web程序,AnnotationConfigEmbeddedWebApplicationContext会在此处创建内置的servlet容器, 比如常见的Tomcat, Jetty。
callRunners
该方法会调用所有实现了CommandLineRunner和ApplicationRunner接口的类。
1
2
3
4
5
6
7
8
9
10
11
12
13
14
15
16
| private void callRunners(ApplicationContext context, ApplicationArguments args) {
List<Object> runners = new ArrayList<>();
runners.addAll(context.getBeansOfType(ApplicationRunner.class).values());
runners.addAll(context.getBeansOfType(CommandLineRunner.class).values());
AnnotationAwareOrderComparator.sort(runners);
for (Object runner : new LinkedHashSet<>(runners)) {
if (runner instanceof ApplicationRunner) {
callRunner((ApplicationRunner) runner, args);
}
if (runner instanceof CommandLineRunner) {
callRunner((CommandLineRunner) runner, args);
}
}
}
|
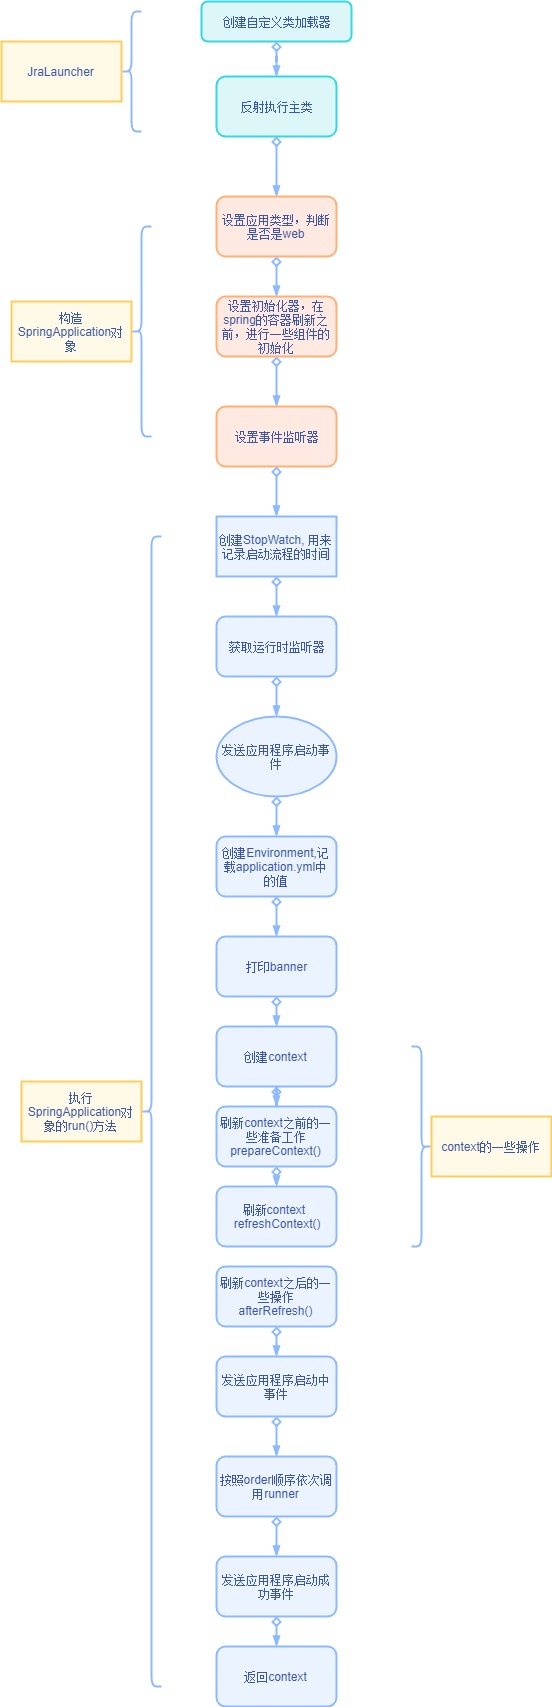
综上, 整个启动流程的图例: